Monday 16 December 2019

New in the Craft Room

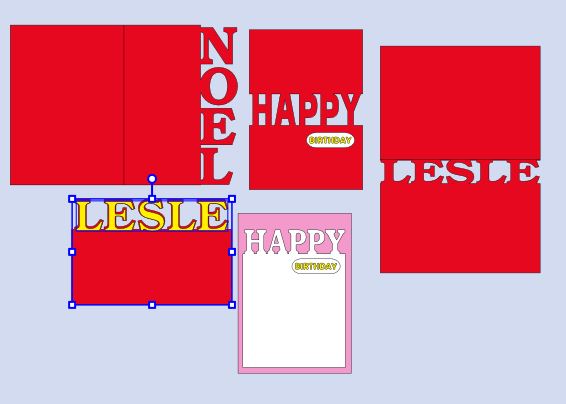
The recent edition to my Craft Room is a Cricut Maker. After having a ScanNcut for several years this was the next step. There is a lot to love in this machine -- and of course I needed to make it mine. So out came the glitter vinyl.


Then there are needed/wanted extras of course. he machine has a blade swap out system that you add extra tips to. I got the Embossing tips at Spotlight on special. I have found some great specials on Amazon and get free shipping with my Prime Membership. So I got the Knife Blade, for cutting thick materials. I also found the Debossing tip at a good price today and purchased out of the. Check the link below.

Always extra mats and blades come in handy as well.


This is an affiliate link, if you purchase I may receive a small commission at no extra cost to you. 

Cricut Tip, Fine QuickSwap Debossing Debossing Tip Silver


Friday 13 December 2019

Saturday 7 December 2019

Canvas Workspace Desktop

This program is useful and very versatile. This booklet will help you learn the functionality of the program and use it more successfully.

All options and menu items available within the program are listed and the booklet comes with an extensive index.


Sections include:

  • DOWNLOAD AND INSTALL
  • OPENING SCREEN
    1.  MENU ITEMS
    2. EDIT OPTIONS
    3. OBJECT MODE
    4. OBJECT PANEL
    5  DRAWING AREA
    6. CONTROL AREA
  • HOW TO …
    CREATE YOUR OWN SHAPES
    MAKE A FRAME
    USE A FONT INSTALLED ON YOUR COMPUTER
    USING GLYPHS AND SPECIAL CHARACTERS FROM YOUR FONTS
    EDITING TEXT
    CHANGING FONTS ON TEXT OBJECT
    DRAWING WITH THE SCANNCUT
    DRAW VS CUT LINE
    FILLING A MAT WITH THE SAME OBJECT
    WELD
    DIVIDE
    REMOVE OVERLAP
    SUBTRACT OVERLAP
    ALIGNING OBJECTS
    CREATING AN OFFSET
    EDITING A PATH (NODES)
    USING LAYERS
    TRACE AN IMAGE
  • INDEX


Thursday 28 November 2019

My ScanNcut

Since owning my first ScanNcut several years ago I have kept a notebook with information in it about my machine. I recently considered expanding the information I kept and this notebook is specifically for that purpose.

You may not choose to use all the pages and you may want several copies of some pages. Each page is independent and you can print and use those pages you find most useful.

Sections include:
  • My machine details 
  • My tools 
  • My machine settings 
  • My machine care 
  • My favourite tips 
  • My Canvas Workspace 
  • My files My projects 
  • My favourite websites 
  • My favourite fonts 
  • My favourite suppliers 
  • My notes 
This is designed to record all things you need to know or remember about your ScanNcut. It is a personal record of those things that you want to know and keep.


Available as a PDF download here for $3.00 AUD. It will be sent after payment. If you have any questions please contact me.


Friday 22 November 2019

Shaker card with no foam

I saw a similar idea to this on YouTube and wanted to do it with the ScanNcut. It looks great and very simple to cut and assemble.

Instead of using foam you can build up your your card base.


The video is in 3 parts. The first part has the project from design in Canvas Workspace Desktop, and the second part has cutting. Part 3 is the construction of the card, with full instructions. Enjoy.


Part 1-- Design


Part 2 -- Cutting


Part 3 -- Construction

Saturday 16 November 2019

6 Days of Christmas Projects - Day 6

I have put together 6 projects for Christmas using the ScanNcut. They include designs in Canvas Desktop and cutting on the ScanNcut.


Day 6

One  card two ways. Learn how to use shapes in Canvas Desktop to create a unique shape. This card is shown in two different layouts.


Techniques used:
  • Designing in Canvas Workspace Desktop
  • Creating designs from shapes
  • Image Tracing
  • Resizing shapes

Friday 15 November 2019

6 Days of Christmas Projects - Day 5

I have put together 6 projects for Christmas using the ScanNcut. They include designs in Canvas Desktop and cutting on the ScanNcut.


Day 5

This layered vinyl onto a canvas is simple and  decorative. Using a design from Design Bundles and layering with red, gold and red glitter heat transfer vinyl (HTV) this project creates great results.
The background is done with Kuretake gemstone paints just added in various colours like a patchwork. The paint needs to be thoroughly dry before adhering the HTV.

Tecniques used:
  • adapting a pattern in Canvas Workspace Desktop
  • using layers in Canvas Workspace Desktop
  • using heat transfer vinyl (HTV)
  •  layering vinyl
There are 2 videos for this project. Part 1 is preparing the design, part 2 is the completion of the project.

Part 1


 Part 2

Thursday 14 November 2019

6 Days of Christmas Projects - Day 4


I have put together 6 projects for Christmas using the ScanNcut. They include designs in Canvas Desktop and cutting on the ScanNcut.


Day 4

A Christmas card designed in Canvas Workspace Desktop and created with Mirri Card, cardstock, vinyl and  self adhesive rhinestones. A simple but stricking Christmas card easily adapted to other occasions.

Please note if you follow my dimensions you will need a card 150mmm square. You can of course adjust dimensions to suit yourself. 


Techniques used:
  • Designing in Canvas Workspace Desktop
  • making frames
  • welding
  • using fonts from your computer
  • image tracing
  • cutting vinyl

Wednesday 13 November 2019

6 Days of Christmas Projects - Day 3


I have put together 6 projects for Christmas using the ScanNcut. They include designs in Canvas Desktop and cutting on the ScanNcut.


Day 3

Glass brick decoration. From design to finished product. This decorated brick is decorated with vinyl.


Techniques used:
  • using fonts in Canvas Workspace Desktop
  • adding offset
  • using a character map to add a glyph from a font
  • cutting vinyl

Tuesday 12 November 2019

6 Days of Christmas Projects - Day 2

I have put together 6 projects for Christmas using the ScanNcut. They include designs in Canvas Desktop and cutting on the ScanNcut.


Day 2

This project is a Christmas card. I have used my Foil Quill to do the lettering but you could use a pen as well. A word cutout in the card with foil printing.


Techniques used:
  • Designing in Canvas Workspace Desktop
  • creating a cut out word on a card
  • using fonts on your computer
  • using We R Memory Keepers Foil Quill


Monday 11 November 2019

6 Days of Christmas Projects - Day 1

I have put together 6 projects for Christmas using the ScanNcut. They include designs in Canvas Desktop and cutting on the ScanNcut.


Day 1

This project is place cards. A simple design with great results. You can adapt the design to suit yourself.


Techniques used:
  • designing in Canvas Workspace Desktop
  • using a character map to import a glyph
  • image tracing
  • welding

Thursday 10 October 2019

How to make a Bendy Card

I was asked to show how to make a bendy card and this post will show you how to do that. These fun cards are suitable for any occasion and they fold flat for easy postage. Simply cut and decorate to suit whatever occasion you wish. Here are some similar cards I have made in the past.


If you find them hard to design, or would just prefer a ready made pattern,  I have added three patterns to my Etsy shop here. This file has 3 different styles.


Give it a go, they are a lot of fun.

Thursday 3 October 2019

Using glyphs and special font characters in Canvas Workspace

Many fonts come with extra characters and letters that seem to not be available in Canvas Workspace. Here is shown a very simple way to use these glyphs. These add lots of interest to your projects.

You will need a character map and as this demonstration is done on a PC you can use the Windows character map or another free Windows app, Character Map UWP. Either way you will gain access to those seemingly unavailable extras in your fonts.


Wednesday 18 September 2019

Using Layers in Canvas Workspace desktop

On the great functions available in Canvas Workspace desktop version is the use of layers. Layers can assist in making changes to cut/draw lines, filling, order of cutting. It can also be used to turn off layers so you can send part of a file to the machine.

Take time to learn how to use this function to help you in your projects.


Monday 2 September 2019

Friday 30 August 2019

Thursday 22 August 2019

Adding text to edge and on panels for cards


Adding a panel to your cards with text on the edge and in the panel can showcase your background papaer or be a feature on its own.

This video takes you thru the steps of design in Canvas Workspace to cutting the panels.

I have used a 'bridge' to keep the centres of letters. An alternate method is to save the centres and glue them separately.Either method gives you a stunning card.

Hope you enjoy this eye catching technique.


Wednesday 14 August 2019

Adapting a project for the ScanNcut


This delightful bag is a free pattern available from Canvas Workspace. The instructions are for using the Brother Foil Kit. I wanted to use my Foil Quill so here I take you through the steps of making adjustments to a design to suit your needs. This process works for any alterations you may want to make.

Hope you enjoy the video.

Monday 12 August 2019

Thursday 8 August 2019

Adding Text to Cards and Panels


Using Canvas Workspace to add text to edges of cards, middle of panels, top or bottom of panels or cards is a quick and easy process. This video shows how to do do each of the above examples.


I have added some of these files to a project. You can download the FCM file here and the SVG file here. Please note these files are for personal use only.

Wednesday 31 July 2019

Kockout text in Canvas with the ScanNcut


Just loved the results of this project. Very easy to accomplish in Canvas Workspace. Step by step instructions are available in the video. I have not shown the cutting and weeding in the video, however, the pressing of the heat transfer vinyl is in real time and showing a couple of issues I had.

Hope you give it a go, the results are amazing.


Wednesday 24 July 2019

Foiling and cutting some card greetings


I do a lot of card making and I am always looking for words to add to the front of the card. From the design and preparation to the finished product is achieved by just following some simple steps.

Give it a try and let me know how you go.

Here is the video


If you would like the file you can download the FCM file here and an SVG file here.
Please note these files are foor personal use only.

Wednesday 10 July 2019

Scanning and Cutting on the ScanNcut

I recently had a request for some instructions for scanning. I will admit I mostly scan and cut stamps and have generally had good success. I show this in the video.

I think with most users scanning has a hit and miss sometimes. There are a few pointers worth following.

1. Make sure you have a closed defined outline. If your object does not have that you can lay a piece of acetate over it and draw an outline or perhaps colour the shape to get a good scan.

2. You can transfer your scan to Canvas Workspace and tidy up and rough edges.

3. Scan several times on black and white and colour, the scans will be different most times.

4. Make sure you have good light and no shadows on your mat.

5. You do not necessarily need a scanning mat, you can make one by laying clean white cardstock down and layering a piece of acetate over.

6. If you use Direct cut you will need to use a cutting mat.

7. If you still not get a good scan try photographing and tracing in Canvas Workspace.

Good luck. Hope this helps.


Tuesday 9 July 2019

Foiling with the Foil Quill in two colours


I downloaded a free svg file for a wreath that I wanted to foil. This was a free file from here. I am using this for personal use for my own Christmas cards so copyright is not an issue.

Firstly I compiled the file for all the elements and then made it on my SDX1000 ScanNcut. This principle could also be used for colouring or cutting different parts of a file.

I also received my We R Memory Keepers Magnetic Mat, which I used for the foiling.

Hope you enjoy the video.


Friday 28 June 2019

Cutting LyndsayMakes Iron On Placement Guide on the ScanNcut

I found this great tool mentioned on one of the ScanNcut Facebook groups. It is now suitable for cutting on the ScanNcut. You can purchase the file from LyndsayMakes. If you prefer you can also purchase it ready made.

You will need Canvas Desktop, 12x24 inch mat, plastic sheets to cut from and a deep cut blade if you are usong a CM series model. 


I cut these from Birch 32x47 stencil plastic. It was cut on my SDX1000.


This is just as easily cut on the CM series of machines. You just need to do some testing for the right cut depth and pressure.


I did not trim the plastic before cutting but you do need to ensure it sits well with your rollers. So I laid mine with the left side clear of the roller and the right side under the roller. If the roller straddles the plastic I have found that it can slip and the second cut can be slightly off centre.


The pattern includes the Guide, the Pocket Guide and two Rulers, one for each guide. Using a half cut you can easily see the markings.


Using the guide you can easily place your htv in the correct position.


Here is a video on cutting the guide on an SDX1000.


Thursday 6 June 2019

Roll Feeder for SDX Models of the ScanNcut

I must admit I purchased my Roll Feeder back in October last year and it has been sitting in my drawer. I decided to give it a go. I absolutely loved it! It as easy to setup and use.

There are a couple of important things to know:
1. You need to adjust your roller (instructions on video)

2. Patterns can only be designed and transferred from desktop version of  Canvas Workspace.

3. The file on Canvas will not save as an fcm in the Roll Feeder format. You either have to change the mat size to 12x12 or 12x24 or Save as a Canvas Workspace project file (cwpj).

4. The vinyl edge that is going to feed into the machine must have a straight edge, use the trimmer if necessary.

I will be using this accessory frequently. 


Using a metal sheet for the Foil Quill

I have been experimenting using a metal shim to use for the Foil Quill. This worked well because the foiled piece was easy to remove from the mat as it was only temporarily adhered to the metal shim. So the pressure did not have to be adjusted.

We R Memory Keepers is producing a Foil Quill Magnetic Mat, which they state 'works with All Silhouette Cameo Versions, Cricut Maker, Cricut Explore, Brother ScanNCut SDX, Sizzix Eclips'. They have also said they are testing them on other cutting machines so hopefully that will include the ScanNcut CM models.The new mat is expected for release in June 2019.

Here is a video of how you can use the shim.


Sunday 26 May 2019

Cutting HTV (heat transfer vinyl) on the ScanNcut


This video gives some tips to making this project. Although in this case I have used HTV you can use the same principles to cutting normal vinyl.

Test cuts are so important to make sure you cut correctly the first time. Although I am using the SDX1000 this option is available on the CM series machines.  Adjust up if not cutting deep enough. Adjust down if cutting too deeply. Adjust in small increments until you get a good cut, then record your settings. I have uploaded a sheet here for keeping a record.


Tuesday 30 April 2019

Alcohol Inks, Foil Quill and ScanNcut

Today I have been playing with Alcohol Inks. I have been using Tim Holtz inks and having heaps of fun. Added to that I used my Foil Quill to do the greetings and then the ScanNcut to cut the shapes and shadows in vellum.Pleased with the results.

Another thing I tried today was cutting X-PressIt foam with double sided adhesive. Never had a great deal of success with this on the ScanNcut, however, the autoblade made it a breeze and I was able cut the exact shape and size I needed. Cutting Mirri Card was also so easy with a lovely clean cut.


Thursday 18 April 2019

Foil Quill with the ScanNcut

This video takes you through the steps of creating a file to foil and then cut. I am using the SDX1000 but the procedure is basically the same for any model of the ScanNcut. I forgot to mention in the video that this was the fine point quill.

The Foil Quill, made by We R Memory Keepers, is a fun addition to my craft room.


Wednesday 17 April 2019

Draw and Fill on the ScanNcut

This process will work for text and images on the ScanNcut. I am demonstrating on the SDX1000, however the fill feature is also available on the CM models. (For details on those models check this video)

Choose an object or text and follow these simple steps to get a filled in drawing. It will work for the new Foil Quill from We Are Memory Keepers.

Here is a link to the Alphabet FCM file to view your fonts.


Friday 12 April 2019

SccanNcut Help available online

This is a short video on how to get help from the Brother website. It is always a good idea to have the full manual, I have printed a copy to have on hand if I need it. I have also printed the Pattern List Viewing the patterns this way is much easier than looking on the machine.

I hope you find this helpful.


Tuesday 9 April 2019

Card decorations

It has been too long since I have been able to craft so today I thought I would get some toppers ready to make some cards. I was having such fun that I now have plenty of these.


First I cut the shape on mt ScanNcut, I layered three of them together and allowed them to thoroughly dry. I then coloured them in several ways. I used Kuretake Pearl Colour paints,  Distress Stains,Distress Oxide inks. For most I simply used my embossing powders.The results were similar for all methods. I have left some so that I colour for specific projects.

With the Distress inks and stains you get a nice variegated colour which adds interest.

To do several layers of heat embossing: ink over with embossing ink, I found it easier to press the shape into the ink. Then heat and melt the embossing powder as usual. When set repeat again as required.

The Kuretake pearl paint: I simply painted and allowed it to dry. I then did three embossing layers with Clear Gloss embossing powder.


Distress Stain: I rolled over the stain and allowed it to dry. I then did two layers od Clear Gloss embossing powder. On the gold leaves I did the last embossing layer with Clear Sparkle embossing powder.


Distress Oxide Inks: here I pressed the inkpad over the cutout, using apaint brush on any missed areas. After allowing it to dry i embossed three times


Embossing powder:  I used several different embossing powders from my stash. Mostly embossed three times, occasionally using Clear Sparkle as the top coat.


This technique can be used on a lot of shapes, here is the leaf fcm file.

Tuesday 15 January 2019

Cork Fabric on the ScanNcut

UPDATE
I cut some more cork fabric to make a wallet. (Free pattern from Sew Sweetness.) This time I placed the cork pattern face down and cut with the same settings as below. Cut beautifully.


Today I decided to have a go with cork fabric on my ScanNcut. This was a plain cork but you can get many patterns and colours. I purchased mine thru Aussie Cork on Facebook.

This fabric is made by adhering cork pieces to a backing of cotton and the finished product looks a little like canvas on the back. You need a good sharp blade and although I used a new mat I also taped the cork down.

As always I did a test cut which worked well. I did find the cork lifted a little as it cut and I had brayered it down so I sat beside the machine and pressed it down as it lifted.

I found the auto sensing was cutting a little too deep so I set it to speed 1 and cut pressure -2. You would need to play a little and get your settings right. (I have the SDX1000)

It was a fun little piece and as I wanted to use it I thought I would make a bookmark, so I layered some fabric between the patterned cork and a plain piece and sewed it together on my machine. You could, of course,

use a fabric glue instead of sewing.

Good fun and I will be playing with this again.